Nature's Force System: Difference between revisions
No edit summary |
(Visual difference between orb and bar amount clarified, buff is always active in awakening, Feature Information section added, Tips and Details section added.) |
||
| Line 12: | Line 12: | ||
=== Increasing Amount of Nature Orbs === | === Increasing Amount of Nature Orbs === | ||
Rena is able to charge up the nature | Rena is able to charge up the nature orb gauge by hitting targets with basic kicks and arrow commands. After using '''6''' commands, '''1''' bar of the nature orb gauge is filled. | ||
<br> | <br> | ||
E.g., using {{CDR}}{{CU}}{{CX}}{{CX}}{{CX}} is three commands despite having five hits total. | E.g., using {{CDR}}{{CU}}{{CX}}{{CX}}{{CX}} is three commands despite having five hits total. | ||
Using skills will also increase Rena's | Using skills will also increase Rena's nature orb gauge. Unlike commands, they do not have to hit a target. For every 150 MP used on the activation of skills, one nature orb bar is gained. I.e., each command generates as much as a 25 MP skill: | ||
<br> | |||
*30 MP Active: +1.2 commands | |||
*100 MP skill: +4 commands | |||
*200 MP skill: +8 commands | |||
*300 MP skill: +12 commands<br> | |||
As the bars fill, certain graphical effects will surround Rena: | |||
* | *1 bar: A faint green orb appears. | ||
* | *2 bars: The orb has a green trail. | ||
* | *3 bars: The orb becomes more luminous. | ||
* | *4 bars: A second orb appears. It has the same appearance as the previous stage. | ||
*5 bars: A third orb appears. Same appearance. | |||
**Since the number of orbs do not match the number of bars filled, they aren't a good indicator of your gauge's current status. | |||
[[Image:NF2.png]] | [[Image:NF2.png]] | ||
<br> | <br> | ||
| Line 39: | Line 47: | ||
=== Nature's Force Buff === | === Nature's Force Buff === | ||
When Rena has 3 | When Rena has at least 3 bars in her nature orb gauge, she gains a passive buff that increases her '''movement speed, passive MP recovery, and damage reduction.''' In [[Awakening Mode]], this buff is always active. | ||
[[Image:Ns4.png]] | [[Image:Ns4.png]] | ||
<br> | <br> | ||
| Line 49: | Line 54: | ||
=== Nature's Force Damage Boost === | === Nature's Force Damage Boost === | ||
[[Image:NF5.png|300px|right]] | [[Image:NF5.png|300px|right]] | ||
When Rena has at least 1 nature orb, she is able to use that orb alongside her attacks. | When Rena has at least 1 bar in her nature orb gauge, she is able to use that orb alongside her attacks. | ||
*At the end of each combo, an orb will explode on the target. However, this does not apply to single hit combos (E.g: ↑Z). | *At the end of each combo, an orb will explode on the target. However, this does not apply to single hit combos (E.g: ↑Z). | ||
**Some combos removed the orb detonation after a later patch on the same day. | **Some combos removed the orb detonation after a later patch on the same day. | ||
| Line 55: | Line 60: | ||
***Combat Ranger: ↑↑Z[Z] | ***Combat Ranger: ↑↑Z[Z] | ||
***Night Watcher: →→↑Z[Z], →→Z[X], ZZZ[X] | ***Night Watcher: →→↑Z[Z], →→Z[X], ZZZ[X] | ||
*The | *The list below shows the maximum number of bars used for each eligible skill. The explosion hits the first target struck by the skill. | ||
**If a skill is used with less than the maximum number of bars, the explosion damage is equal to the number of bars available. | |||
**Some skills (e.g., [[Phoenix Strike]]) do not use bars. | |||
**If | |||
{| cellpadding="3" style="border-collapse: collapse; border: 0px solid rgb(0, 0, 0); width=100%; valign=top;" | {| cellpadding="3" style="border-collapse: collapse; border: 0px solid rgb(0, 0, 0); width=100%; valign=top;" | ||
|- | |- | ||
| Line 67: | Line 72: | ||
|- style="background-color: rgb(255, 255, 255);" | |- style="background-color: rgb(255, 255, 255);" | ||
| width="40" | [[Image:Multiplestinger.png]]<br> | | width="40" | [[Image:Multiplestinger.png]]<br> | ||
| width="150" | [[Multiple Stinger]]<br>: 2 | | width="150" | [[Multiple Stinger]]<br>: 2 Bars<br> | ||
|- style="background-color: rgb(255, 255, 255);" | |- style="background-color: rgb(255, 255, 255);" | ||
| width="40" | [[Image:Back Tumbling Shot.PNG]]<br> | | width="40" | [[Image:Back Tumbling Shot.PNG]]<br> | ||
| width="150" | [[Back Tumbling Shot]]<br>:1 | | width="150" | [[Back Tumbling Shot]]<br>:1 Bar<br> | ||
|- style="background-color: rgb(255, 255, 255);" | |- style="background-color: rgb(255, 255, 255);" | ||
| width="40" | [[Image:Risingfalcon.png]]<br> | | width="40" | [[Image:Risingfalcon.png]]<br> | ||
| width="150" | [[Rising Falcon]]<br>: 1 | | width="150" | [[Rising Falcon]]<br>: 1 Bar<br> | ||
|- style="background-color: rgb(255, 255, 255);" | |- style="background-color: rgb(255, 255, 255);" | ||
| width="40" | [[Image:Assault Kick.PNG]]<br> | | width="40" | [[Image:Assault Kick.PNG]]<br> | ||
| width="150" | [[Assault Kick]]<br>: 1 | | width="150" | [[Assault Kick]]<br>: 1 Bar<br> | ||
|- style="background-color: rgb(255, 255, 255);" | |- style="background-color: rgb(255, 255, 255);" | ||
| width="40" | [[Image:Rail Stinger.PNG]]<br> | | width="40" | [[Image:Rail Stinger.PNG]]<br> | ||
| width="150" | [[Rail Stinger]]<br>: 1 | | width="150" | [[Rail Stinger]]<br>: 1 Bar<br> | ||
|- style="background-color: rgb(255, 255, 255);" | |- style="background-color: rgb(255, 255, 255);" | ||
| width="40" | [[Image:Perfect Strom.PNG]] | | width="40" | [[Image:Perfect Strom.PNG]] | ||
| width="150" | [[Perfect Storm]]<br>: 2 | | width="150" | [[Perfect Storm]]<br>: 2 Bars<br> | ||
|- style="background-color: rgb(255, 255, 255);" | |- style="background-color: rgb(255, 255, 255);" | ||
| width="40" | [[Image:Siege.PNG]] | | width="40" | [[Image:Siege.PNG]] | ||
| width="150" |[[Siege|Siege Mode]]<br>: 1 | | width="150" |[[Siege|Siege Mode]]<br>: 1 Bar<br> | ||
|- style="background-color: rgb(255, 255, 255);" | |- style="background-color: rgb(255, 255, 255);" | ||
| width="40" | [[Image:Aero Tornado.PNG]] | | width="40" | [[Image:Aero Tornado.PNG]] | ||
| width="150" | [[Aero Tornado]]<br>: 3 | | width="150" | [[Aero Tornado]]<br>: 3 Bars<br> | ||
|} | |} | ||
| Line 97: | Line 102: | ||
|- style="background-color: rgb(255, 255, 255);" | |- style="background-color: rgb(255, 255, 255);" | ||
| width="40" | [[Image:Shooting Magnum.png]] | | width="40" | [[Image:Shooting Magnum.png]] | ||
| width="150" | [[Shooting Magnum]]<br>: 1 | | width="150" | [[Shooting Magnum]]<br>: 1 Bar<br> | ||
|- style="background-color: rgb(255, 255, 255);" | |- style="background-color: rgb(255, 255, 255);" | ||
| width="40" | [[Image:Guide Arrow.png]] | | width="40" | [[Image:Guide Arrow.png]] | ||
| width="150" | [[Guide Arrow]]<br>: 2 | | width="150" | [[Guide Arrow]]<br>: 2 Bars<br> | ||
|- style="background-color: rgb(255, 255, 255);" | |- style="background-color: rgb(255, 255, 255);" | ||
| width="40" | [[Image:Entangle.png]] | | width="40" | [[Image:Entangle.png]] | ||
| width="150" | [[Entangle]]<br>: 1 | | width="150" | [[Entangle]]<br>: 1 Bar<br> | ||
|- style="background-color: rgb(255, 255, 255);" | |- style="background-color: rgb(255, 255, 255);" | ||
| width="40" | [[Image:Crazy Shot.png]] | | width="40" | [[Image:Crazy Shot.png]] | ||
| width="150" | [[Crazy Shot]]<br>: 3 | | width="150" | [[Crazy Shot]]<br>: 3 Bars<br> | ||
|- style="background-color: rgb(255, 255, 255);" | |- style="background-color: rgb(255, 255, 255);" | ||
| width="40" | [[Image:Gungnir.png]] | | width="40" | [[Image:Gungnir.png]] | ||
| width="150" | [[Gungnir]]<br>: 3 | | width="150" | [[Gungnir]]<br>: 3 Bars<br> | ||
|- style="background-color: rgb(255, 255, 255);" | |- style="background-color: rgb(255, 255, 255);" | ||
| width="40" | [[Image:Reflect Kick.png]] | | width="40" | [[Image:Reflect Kick.png]] | ||
| width="150" | [[Reflective Kick]]<br>: 1 | | width="150" | [[Reflective Kick]]<br>: 1 Bar<br> | ||
|- style="background-color: rgb(255, 255, 255);" | |- style="background-color: rgb(255, 255, 255);" | ||
| width="40" | [[Image:CAs2.png]] | | width="40" | [[Image:CAs2.png]] | ||
| width="150" | [[Stigma Shot]]<br>: 1 | | width="150" | [[Stigma Shot]]<br>: 1 Bar<br> | ||
|- style="background-color: rgb(255, 255, 255);" | |- style="background-color: rgb(255, 255, 255);" | ||
| width="40" | [[Image:Arch shot.png]] | | width="40" | [[Image:Arch shot.png]] | ||
| width="150" | [[Arc Shot]]<br>: 1 | | width="150" | [[Arc Shot]]<br>: 1 Bar<br> | ||
|- style="background-color: rgb(255, 255, 255);" | |- style="background-color: rgb(255, 255, 255);" | ||
| width="40" | [[Image:Rapid Shot.png]] | | width="40" | [[Image:Rapid Shot.png]] | ||
| width="150" | [[Rapid Shot]]<br>: 1 | | width="150" | [[Rapid Shot]]<br>: 1 Bar<br> | ||
|- style="background-color: rgb(255, 255, 255);" | |- style="background-color: rgb(255, 255, 255);" | ||
| width="40" | [[Image:SI Aero-Strafe.png]] | | width="40" | [[Image:SI Aero-Strafe.png]] | ||
| width="150" | [[Aero-Strafe]]<br>: 2 | | width="150" | [[Aero-Strafe]]<br>: 2 Bars<br> | ||
|- style="background-color: rgb(255, 255, 255);" | |- style="background-color: rgb(255, 255, 255);" | ||
| width="40" | [[Image:Wind Blast.png]] | | width="40" | [[Image:Wind Blast.png]] | ||
| width="150" | [[Wind Blast]]<br>: 2 | | width="150" | [[Wind Blast]]<br>: 2 Bars<br> | ||
|- style="background-color: rgb(255, 255, 255);" | |- style="background-color: rgb(255, 255, 255);" | ||
| width="40" | [[Image:Wind Ward.png]] | | width="40" | [[Image:Wind Ward.png]] | ||
| width="150" | [[Wind Ward]]<br>: 2 | | width="150" | [[Wind Ward]]<br>: 2 Bars<br> | ||
|- style="background-color: rgb(255, 255, 255);" | |- style="background-color: rgb(255, 255, 255);" | ||
| width="40" | [[Image:GAs1.png]] | | width="40" | [[Image:GAs1.png]] | ||
| width="150" | [[Freezing Arrow - Sting]]<br>: 1 | | width="150" | [[Freezing Arrow - Sting]]<br>: 1 Bar<br> | ||
|- style="background-color: rgb(255, 255, 255);" | |- style="background-color: rgb(255, 255, 255);" | ||
| width="40" | [[Image:Freezing Arrow D.png]] | | width="40" | [[Image:Freezing Arrow D.png]] | ||
| width="150" | [[Freezing Arrow - Drizzle]]<br>: 1 | | width="150" | [[Freezing Arrow - Drizzle]]<br>: 1 Bar<br> | ||
|} | |} | ||
| Line 146: | Line 151: | ||
|- style="background-color: rgb(255, 255, 255);" | |- style="background-color: rgb(255, 255, 255);" | ||
| width="40" | [[Image:Spinning Kick.png]] | | width="40" | [[Image:Spinning Kick.png]] | ||
| width="150" | [[Spinning Kick]]<br>: 1 | | width="150" | [[Spinning Kick]]<br>: 1 Bar<br> | ||
|- style="background-color: rgb(255, 255, 255);" | |- style="background-color: rgb(255, 255, 255);" | ||
| width="40" | [[Image:Crecent Kick.png]] | | width="40" | [[Image:Crecent Kick.png]] | ||
| width="150" | [[Crescent Kick]]<br>: 2 | | width="150" | [[Crescent Kick]]<br>: 2 Bars<br> | ||
|- style="background-color: rgb(255, 255, 255);" | |- style="background-color: rgb(255, 255, 255);" | ||
| width="40" | [[Image:Low Kick.PNG]] | | width="40" | [[Image:Low Kick.PNG]] | ||
| width="150" | [[Low Kick]]<br>: 1 | | width="150" | [[Low Kick]]<br>: 1 Bar<br> | ||
|- style="background-color: rgb(255, 255, 255);" | |- style="background-color: rgb(255, 255, 255);" | ||
| width="40" | [[Image:Middle Kick.png]] | | width="40" | [[Image:Middle Kick.png]] | ||
| width="150" | [[Middle Kick]]<br>: 1 | | width="150" | [[Middle Kick]]<br>: 1 Bar<br> | ||
|- style="background-color: rgb(255, 255, 255);" | |- style="background-color: rgb(255, 255, 255);" | ||
| width="40" | [[Image:TAI-HO-MING.png]] | | width="40" | [[Image:TAI-HO-MING.png]] | ||
| width="150" | [[Dive Kick Bombing]]<br>: 3 | | width="150" | [[Dive Kick Bombing]]<br>: 3 Bars<br> | ||
|- style="background-color: rgb(255, 255, 255);" | |- style="background-color: rgb(255, 255, 255);" | ||
| width="40" | [[Image:Copy of SC 2010 9 17 12 43 54 .PNG]] | | width="40" | [[Image:Copy of SC 2010 9 17 12 43 54 .PNG]] | ||
| width="150" | [[Violent Attack]]<br>: 3 | | width="150" | [[Violent Attack]]<br>: 3 Bars<br> | ||
|- style="background-color: rgb(255, 255, 255);" | |- style="background-color: rgb(255, 255, 255);" | ||
| width="40" | [[Image:Reflect Kick.png]] | | width="40" | [[Image:Reflect Kick.png]] | ||
| width="150" | [[Reflective Kick]]<br>: 1 | | width="150" | [[Reflective Kick]]<br>: 1 Bar<br> | ||
|- style="background-color: rgb(255, 255, 255);" | |- style="background-color: rgb(255, 255, 255);" | ||
| width="40" | [[Image:WSs2.png]] | | width="40" | [[Image:WSs2.png]] | ||
| width="150" | [[Nature Force]]<br>: 1 | | width="150" | [[Nature Force]]<br>: 1 Bar<br> | ||
|- style="background-color: rgb(255, 255, 255);" | |- style="background-color: rgb(255, 255, 255);" | ||
| width="40" | [[Image:WSs1.png]] | | width="40" | [[Image:WSs1.png]] | ||
| width="150" | [[Slide Double Kick]]<br>: 1 | | width="150" | [[Slide Double Kick]]<br>: 1 Bar<br> | ||
|- style="background-color: rgb(255, 255, 255);" | |- style="background-color: rgb(255, 255, 255);" | ||
| width="40" | [[Image:Assault Impact.png]] | | width="40" | [[Image:Assault Impact.png]] | ||
| width="150" | [[Assault Impact]]<br>: 1 | | width="150" | [[Assault Impact]]<br>: 1 Bar<br> | ||
|- style="background-color: rgb(255, 255, 255);" | |- style="background-color: rgb(255, 255, 255);" | ||
| width="40" | [[Image:Back Kick.png]] | | width="40" | [[Image:Back Kick.png]] | ||
| width="150" | [[Back Kick]]<br>: 1 | | width="150" | [[Back Kick]]<br>: 1 Bar<br> | ||
|- style="background-color: rgb(255, 255, 255);" | |- style="background-color: rgb(255, 255, 255);" | ||
| width="40" | [[Image:High Kick.png]] | | width="40" | [[Image:High Kick.png]] | ||
| width="150" | [[High Kick]]<br>: 1 | | width="150" | [[High Kick]]<br>: 1 Bar<br> | ||
|- style="background-color: rgb(255, 255, 255);" | |- style="background-color: rgb(255, 255, 255);" | ||
| width="40" | [[Image:SHOCK HO.png]] | | width="40" | [[Image:SHOCK HO.png]] | ||
| width="150" | [[Sharp Fall]]<br>: 2 | | width="150" | [[Sharp Fall]]<br>: 2 Bars<br> | ||
|} | |} | ||
| Line 192: | Line 197: | ||
|- style="background-color: rgb(255, 255, 255);" | |- style="background-color: rgb(255, 255, 255);" | ||
| width="40" | [[Image:Evoke.png]] | | width="40" | [[Image:Evoke.png]] | ||
| width="150" | [[Evoke]]<br>: 1 | | width="150" | [[Evoke]]<br>: 1 Bar<br> | ||
|- style="background-color: rgb(255, 255, 255);" | |- style="background-color: rgb(255, 255, 255);" | ||
| width="40" | [[Image:Fatality.png]] | | width="40" | [[Image:Fatality.png]] | ||
| width="150" | [[Fatality]]<br>: 2 | | width="150" | [[Fatality]]<br>: 2 Bars<br> | ||
|- style="background-color: rgb(255, 255, 255);" | |- style="background-color: rgb(255, 255, 255);" | ||
| width="40" | [[Image:Entangle.png]] | | width="40" | [[Image:Entangle.png]] | ||
| width="150" | [[Binding Seed]]<br>: 1 | | width="150" | [[Binding Seed]]<br>: 1 Bar<br> | ||
|- style="background-color: rgb(255, 255, 255);" | |- style="background-color: rgb(255, 255, 255);" | ||
| width="40" | [[Image:Explosiontrap.png]] | | width="40" | [[Image:Explosiontrap.png]] | ||
| width="150" | [[Explosion Trap]]<br>: 1 | | width="150" | [[Explosion Trap]]<br>: 1 Bar<br> | ||
|- style="background-color: rgb(255, 255, 255);" | |- style="background-color: rgb(255, 255, 255);" | ||
| width="40" | [[Image:Thorn Trap.png]] | | width="40" | [[Image:Thorn Trap.png]] | ||
| width="150" | [[Thorned Vine Trap]]<br>: 1 | | width="150" | [[Thorned Vine Trap]]<br>: 1 Bar<br> | ||
|- style="background-color: rgb(255, 255, 255);" | |- style="background-color: rgb(255, 255, 255);" | ||
| width="40" | [[Image:Spike Trap.png]] | | width="40" | [[Image:Spike Trap.png]] | ||
| width="150" | [[Briar Trap]]<br>: 1 | | width="150" | [[Briar Trap]]<br>: 1 Bar<br> | ||
|- style="background-color: rgb(255, 255, 255);" | |- style="background-color: rgb(255, 255, 255);" | ||
| width="40" | [[Image:Callofruin.png]] | | width="40" | [[Image:Callofruin.png]] | ||
| width="150" | [[Call of Ruin]]<br>: 3 | | width="150" | [[Call of Ruin]]<br>: 3 Bars<br> | ||
|- style="background-color: rgb(255, 255, 255);" | |- style="background-color: rgb(255, 255, 255);" | ||
| width="40" | [[Image:Reflect Kick.png]] | | width="40" | [[Image:Reflect Kick.png]] | ||
| width="150" | [[Reflective Kick]]<br>: 1 | | width="150" | [[Reflective Kick]]<br>: 1 Bar<br> | ||
|- style="background-color: rgb(255, 255, 255);" | |- style="background-color: rgb(255, 255, 255);" | ||
| width="40" | [[Image:NWActive1.png]] | | width="40" | [[Image:NWActive1.png]] | ||
| width="150" | [[Delayed Fire]]<br>: 1 | | width="150" | [[Delayed Fire]]<br>: 1 Bar<br> | ||
|- style="background-color: rgb(255, 255, 255);" | |- style="background-color: rgb(255, 255, 255);" | ||
| width="40" | [[Image:Trappingarrow.png]] | | width="40" | [[Image:Trappingarrow.png]] | ||
| width="150" | [[Trapping Arrow - Buster]]<br>: 2 | | width="150" | [[Trapping Arrow - Buster]]<br>: 2 Bars<br> | ||
|- style="background-color: rgb(255, 255, 255);" | |- style="background-color: rgb(255, 255, 255);" | ||
| width="40" | [[Image:TA fungus.png]] | | width="40" | [[Image:TA fungus.png]] | ||
| width="150" | [[Trapping Arrow - Fungus]]<br>: 2 | | width="150" | [[Trapping Arrow - Fungus]]<br>: 2 Bars<br> | ||
|- style="background-color: rgb(255, 255, 255);" | |- style="background-color: rgb(255, 255, 255);" | ||
| width="40" | [[Image:NWSActive1.png]] | | width="40" | [[Image:NWSActive1.png]] | ||
| width="150" | [[Furious Engage]]<br>: 1 | | width="150" | [[Furious Engage]]<br>: 1 Bar<br> | ||
|- style="background-color: rgb(255, 255, 255);" | |- style="background-color: rgb(255, 255, 255);" | ||
| width="40" | [[Image:NWSActive2.png]] | | width="40" | [[Image:NWSActive2.png]] | ||
| width="150" | [[Gliding Strike]]<br>: 2 | | width="150" | [[Gliding Strike]]<br>: 2 Bars<br> | ||
|- style="background-color: rgb(255, 255, 255);" | |- style="background-color: rgb(255, 255, 255);" | ||
| width="40" | [[Image:Wrath seed.png]] | | width="40" | [[Image:Wrath seed.png]] | ||
| width="150" | [[Wrathful Seed]]<br>: 1 | | width="150" | [[Wrathful Seed]]<br>: 1 Bar<br> | ||
|- style="background-color: rgb(255, 255, 255);" | |- style="background-color: rgb(255, 255, 255);" | ||
| width="40" | [[Image:Eldrasil's rage.png]] | | width="40" | [[Image:Eldrasil's rage.png]] | ||
| width="150" | [[Eldrasil's Rage]]<br>: 1 | | width="150" | [[Eldrasil's Rage]]<br>: 1 Bar<br> | ||
|} | |||
|} | |} | ||
<br> | |||
== Feature Information == | |||
{| cellpadding="5" border="1" style="border-collapse: collapse; text-align: center" | |||
|- style="background:#90EE90" | |||
! rowspan=3 | Bars !! colspan=2 | Explosion !! colspan=6 | Buff | |||
|- style="background:#90EE90" | |||
! rowspan=2 | Damage per<br>Bar Used !! rowspan=2 | Max Bars<br>Used !! colspan=3 | Normal !! colspan=3 | Awakening | |||
|- style="background:#90EE90" | |||
! Movement<br>Speed !! Passive MP<br>Recovery !! Damage<br>Reduction !! Movement<br>Speed !! Passive MP<br>Recovery !! Damage<br>Reduction | |||
|- | |||
| align=left | 1 || rowspan=5 | 370% || rowspan=5 | 3 || rowspan=2 colspan=3 | None || rowspan=5 | +10% || rowspan=5 | +1/3 Seconds || rowspan=5 | +10% | |||
|- | |||
| align=left | 2 | |||
|- | |||
| align=left | 3 || rowspan=3 | +10% || rowspan=3 | +1/3 Seconds || rowspan=3 | +10% | |||
|- | |||
| align=left | 4 | |||
|- | |||
| align=left | 5 | |||
|} | |} | ||
<br> | |||
== Tips and Details == | |||
*Damage is based on (physical attack + magic attack)/2. | |||
*The explosion hits all targets in range and '''ignores defense and guard'''. It also does not knock down. | |||
*[[Siege]] is the only way to deplete the nature orb gauge without increasing its counter. This is done by hitting a target with the kick from entering the stance. Since it costs 0 MP to activate, cancelling Siege after that prevents the gauge from increasing. This is very useful for testing things in Free Training. | |||
*The damage reduction is a rare type and that multiplies the damage reduction stat and adds to it: Damage reduction = 1-(1 - (Stat*1.1 + .1))<br> | |||
**E.g., if you have no damage reduction stat, you gain 10% damage reduction. If you have 40%, it is increased to 54%. In other cases, a 10% damage reduction buff would increase the 40% to 46% due to different mechanics. | |||
**[[The Evolution/3 - Secret Dungeon Reorganization|Mechanized Mark III]]'s 5-set effect and [[Chivalry]] are the other buffs of this type. | |||
<br> | |||
== Trivia == | |||
*Although the poster states the system as '''Nature Force,''' a direct translation of the words indicate it as '''Nature's Spirit.''' | |||
**This is how in NA, this feature is named '''Nature's Force''', similar to the KR poster. | |||
***Easy to confuse with [[Wind Sneaker]]'s [[Nature Force]]. | |||
*Implemented ZZZ cancel point (ZZZ loop) and GA ^^XX combo. | |||
<br> | <br> | ||
== | == Updates == | ||
*01/02/2014 KR | *01/02/2014 KR | ||
**Nature's Spirit system added. | **Nature's Spirit system added. | ||
| Line 246: | Line 287: | ||
**Commands required to gain a nature orb reduced from seven to six. | **Commands required to gain a nature orb reduced from seven to six. | ||
**Skills increase your Nature's Spirit command count on activation. | **Skills increase your Nature's Spirit command count on activation. | ||
<br> | <br> | ||
{{SpecialAbilities}} | {{SpecialAbilities}} | ||
{{Guides}} | {{Guides}} | ||
Revision as of 06:17, 3 September 2014

Every character in Elsword has their own set of unique features that sets them apart from other characters.
Nature's Force

On 01/02/2014 in the Korean server, Rena received a new system, the Nature's Force system. Nature's Force is a system exclusive to only elves. The system interface is indicated below the MP bar. The orbs are indicated in game as NF.
Increasing Amount of Nature Orbs
Rena is able to charge up the nature orb gauge by hitting targets with basic kicks and arrow commands. After using 6 commands, 1 bar of the nature orb gauge is filled.
E.g., using ![]()
![]()
![]()
![]()
![]() is three commands despite having five hits total.
is three commands despite having five hits total.
Using skills will also increase Rena's nature orb gauge. Unlike commands, they do not have to hit a target. For every 150 MP used on the activation of skills, one nature orb bar is gained. I.e., each command generates as much as a 25 MP skill:
- 30 MP Active: +1.2 commands
- 100 MP skill: +4 commands
- 200 MP skill: +8 commands
- 300 MP skill: +12 commands
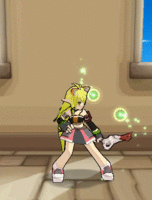
As the bars fill, certain graphical effects will surround Rena:
- 1 bar: A faint green orb appears.
- 2 bars: The orb has a green trail.
- 3 bars: The orb becomes more luminous.
- 4 bars: A second orb appears. It has the same appearance as the previous stage.
- 5 bars: A third orb appears. Same appearance.
- Since the number of orbs do not match the number of bars filled, they aren't a good indicator of your gauge's current status.

New Double Jump

Along with the new system, Rena's mobility is also improved. Her double jump has been changed to from a midair somersault to jumping off a platform made of wind and leaves. Like Elsword and Raven, Rena is also able to air dash, but with a lower distance. Along with the new double jump, Combat Ranger's ^^ZZ is also changed to drag target towards you instead of kicking them into the air.
-
New Double Jump animation
-
New ^^ZZ animation (For CR/WS)
-
Old Double Jump


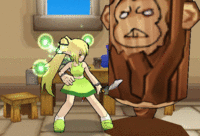
Nature's Force Buff
When Rena has at least 3 bars in her nature orb gauge, she gains a passive buff that increases her movement speed, passive MP recovery, and damage reduction. In Awakening Mode, this buff is always active.

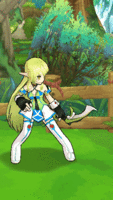
Nature's Force Damage Boost

When Rena has at least 1 bar in her nature orb gauge, she is able to use that orb alongside her attacks.
- At the end of each combo, an orb will explode on the target. However, this does not apply to single hit combos (E.g: ↑Z).
- Some combos removed the orb detonation after a later patch on the same day.
- Sniping Ranger: ↑↑X[X], →→X[X]
- Combat Ranger: ↑↑Z[Z]
- Night Watcher: →→↑Z[Z], →→Z[X], ZZZ[X]
- Some combos removed the orb detonation after a later patch on the same day.
- The list below shows the maximum number of bars used for each eligible skill. The explosion hits the first target struck by the skill.
- If a skill is used with less than the maximum number of bars, the explosion damage is equal to the number of bars available.
- Some skills (e.g., Phoenix Strike) do not use bars.


Feature Information
| Bars | Explosion | Buff | ||||||
|---|---|---|---|---|---|---|---|---|
| Damage per Bar Used |
Max Bars Used |
Normal | Awakening | |||||
| Movement Speed |
Passive MP Recovery |
Damage Reduction |
Movement Speed |
Passive MP Recovery |
Damage Reduction | |||
| 1 | 370% | 3 | None | +10% | +1/3 Seconds | +10% | ||
| 2 | ||||||||
| 3 | +10% | +1/3 Seconds | +10% | |||||
| 4 | ||||||||
| 5 | ||||||||
Tips and Details
- Damage is based on (physical attack + magic attack)/2.
- The explosion hits all targets in range and ignores defense and guard. It also does not knock down.
- Siege is the only way to deplete the nature orb gauge without increasing its counter. This is done by hitting a target with the kick from entering the stance. Since it costs 0 MP to activate, cancelling Siege after that prevents the gauge from increasing. This is very useful for testing things in Free Training.
- The damage reduction is a rare type and that multiplies the damage reduction stat and adds to it: Damage reduction = 1-(1 - (Stat*1.1 + .1))
- E.g., if you have no damage reduction stat, you gain 10% damage reduction. If you have 40%, it is increased to 54%. In other cases, a 10% damage reduction buff would increase the 40% to 46% due to different mechanics.
- Mechanized Mark III's 5-set effect and Chivalry are the other buffs of this type.
Trivia
- Although the poster states the system as Nature Force, a direct translation of the words indicate it as Nature's Spirit.
- This is how in NA, this feature is named Nature's Force, similar to the KR poster.
- Easy to confuse with Wind Sneaker's Nature Force.
- This is how in NA, this feature is named Nature's Force, similar to the KR poster.
- Implemented ZZZ cancel point (ZZZ loop) and GA ^^XX combo.
Updates
- 01/02/2014 KR
- Nature's Spirit system added.
- 01/28/2014 KR
- Commands required to gain a nature orb reduced from seven to six.
- Skills increase your Nature's Spirit command count on activation.