Dynamo Point System: Difference between revisions
Shironsaki (talk | contribs) m (Text replacement - "MastermindSkill11 (Old).png" to "MastermindSkill11.png") |
|||
| (48 intermediate revisions by 5 users not shown) | |||
| Line 1: | Line 1: | ||
<includeonly>{{#arraydefine:Dynamo Point System|1.15, 1.15}}</includeonly><noinclude> | |||
{{Languages|Dynamo Point System}} | {{Languages|Dynamo Point System}} | ||
== Dynamo Point System == | == Dynamo Point System == | ||
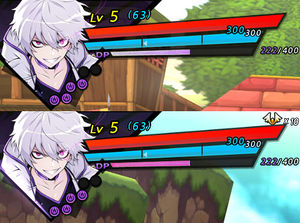
[[File:DPSystem.jpg|thumb|Character UI when DC mode is on and off.]] | [[File:DPSystem.jpg|thumb|Character UI when DC mode is on and off.]] | ||
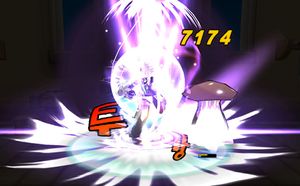
[[File:DPHit.jpg|thumb|Damage deal during awakening.]] | [[File:DPHit.jpg|thumb|Damage deal during awakening.]] | ||
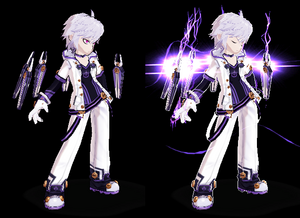
[[File:DPMode.png|thumb|Base Add while in normal stance and DC mode stance. | [[File:DPMode.png|thumb|Base Add while in normal stance and DC mode stance.]] | ||
Add does not have an Awakening Gauge, but instead has Dynamo Points (DP), which are consumed when awakening or using skills and commands.<br> | |||
By default, Add will be in '''Dynamo Dissolution''' mode. Once awakened, he will enter the '''Dynamo Configuration''' mode. | |||
* | *The total number of DP is 400. | ||
* | *DP can be obtained by hitting during Dynamo Dissolution mode or being attacked in both modes. | ||
**The gauge is not affected by mount attacks. | **The gauge is not affected by mount attacks. | ||
* | *When you have at least 100 DP, Add is able to enter the Dynamo Configuration mode (Awakening) at the cost of 50 DP (DP consumption reduction will reduce this), dealing 300% magical damage to surrounding targets. | ||
* | *Awakening can be turned on/off freely, but re-awakening can only be done after 5 seconds of awakening. | ||
*During Dynamo Configuration mode (Awakening), commands will deplete the DP gauge instead. | |||
*Unlike other characters, the awakening duration is unlimited. DP is gradually increase at a rate of 5 DP per second in PvE. | |||
**Like awakening, Add will gain a damage boost when in DC Mode. | |||
*If you obtain a awakening potion in dungeons, instead of awakening, the DP gauge will increase. | *If you obtain a awakening potion in dungeons, instead of awakening, the DP gauge will increase. | ||
**This also applies when Fever triggers. | **This also applies when Fever triggers. | ||
*Unlike a normal awakening, when Add goes into DC mode, the screen will not freeze. | *Unlike a normal awakening, when Add goes into DC mode, the screen will not freeze. | ||
**Add does, however, gain momentary invincibility. | **Add does, however, gain momentary invincibility. | ||
*When in | *When in awakening , some skills that use DP will use only 20% of the required amount, whereas some skills that recover DP when he is in Normal Mode won't recover DP in DC mode. | ||
*Different job advancements will have different DC mode poses. | *Different job advancements will have different DC mode poses. | ||
*When going into DC mode, enemies surrounding you will be damaged.<br> | *When going into DC mode, enemies surrounding you will be damaged.<br> | ||
'''Benefits of | '''Benefits of Dynamo Configuration mode:''' | ||
*The standard 20% damage increase from awakening mode. | *The standard 20% damage increase from awakening mode. | ||
*Able to execute Nasod Armor combo extensions depending on the job advancement. | *Able to execute Nasod Armor combo extensions depending on the job advancement. | ||
| Line 41: | Line 44: | ||
! class="unsortable" | Class !! class="unsortable" | Skill Name !! DMP Use | ! class="unsortable" | Class !! class="unsortable" | Skill Name !! DMP Use | ||
|- | |- | ||
| [[Add | | [[Add]] || [[File:AddSkill1.png|27px]] [[Void Breaker]] || 2 | ||
|- | |- | ||
| [[Add | | [[Add]] || [[File:AddSkill8.png|27px]] [[Particle Accelerator]] || 4 | ||
|- | |- | ||
| [[Add | | [[Add]] || [[File:AddSkill3.png|27px]] [[Particle Prism]] || 1 | ||
|} | |} | ||
|- | |- | ||
| Line 52: | Line 55: | ||
! class="unsortable" | Class !! class="unsortable" | Skill Name !! DMP Use | ! class="unsortable" | Class !! class="unsortable" | Skill Name !! DMP Use | ||
|- | |- | ||
| [[Psychic Tracer]] || [[File: | | [[Psychic Tracer]] || [[File:PsychicTracerSkill2.png|27px]] [[Quake Buster]] ([[Quake Buster/ModA|A]]) || 2 | ||
|- | |- | ||
| [[Psychic Tracer]] || [[File: | | [[Psychic Tracer]] || [[File:PsychicTracerSkill4.png|27px]] [[Sonic Jump]] || 3 | ||
|- | |- | ||
| [[Lunatic Psyker]] || [[File: | | [[Lunatic Psyker]] || [[File:LunaticPsykerSkill1.png|27px]] [[Conqueror]] || 3 | ||
|- | |- | ||
| [[Lunatic Psyker]] || [[File: | | [[Lunatic Psyker]] || [[File:LunaticPsykerSkill2.png|27px]] [[Energy Shock]] || 1 | ||
|- | |- | ||
| [[Lunatic Psyker]] || [[File: | | [[Lunatic Psyker]] || [[File:LunaticPsykerSkill3.png|27px]] [[Psychic Storm]] ([[Psychic Storm/ModA|A]]) || 3 | ||
|- | |- | ||
| [[Lunatic Psyker]] || [[File: | | [[Lunatic Psyker]] || [[File:LunaticPsykerSkill6.png|27px]] [[Nasod Armor Mode - Full Burst]] || 2 | ||
|- | |- | ||
| [[Lunatic Psyker]] || [[File: | | [[Lunatic Psyker]] || [[File:LunaticPsykerSkill7.png|27px]] [[Quicksilver Accel]] || 1 | ||
|- | |- | ||
| [[Lunatic Psyker# | | [[Lunatic Psyker#Transcendence|Transcendent Lunatic Psyker]] || [[File:LunaticPsykerSkill8.png|27px]] [[Psion Rush]] || 1 | ||
|- | |- | ||
| [[Lunatic Psyker# | | [[Lunatic Psyker#Transcendence|Transcendent Lunatic Psyker]] || [[File:LunaticPsykerSkill10.png|27px]] [[Quicksilver Strike]] || 3 | ||
|- | |- | ||
| [[Lunatic Psyker# | | [[Lunatic Psyker#Transcendence|Transcendent Lunatic Psyker]] || [[File:LunaticPsykerSkill11.png|27px]] [[Supersonic]] || 3 | ||
|} | |} | ||
| valign="top" | | | valign="top" | | ||
| Line 76: | Line 79: | ||
! class="unsortable" | Class !! class="unsortable" | Skill Name !! DMP Use | ! class="unsortable" | Class !! class="unsortable" | Skill Name !! DMP Use | ||
|- | |- | ||
| [[Arc Tracer]] || [[File: | | [[Arc Tracer]] || [[File:ArcTSkill1.png|27px]] [[Dynamo Configuration - Rushing Drones]] || 1 | ||
|- | |- | ||
| [[Arc Tracer]] || [[File: | | [[Arc Tracer]] || [[File:ArcTracerSkill2.png|27px]] [[Panzer Buster]] ([[Panzer Buster/ModA|A]]) || 3 | ||
|- | |- | ||
| [[Arc Tracer]] || [[File: | | [[Arc Tracer]] || [[File:ArcTSkill4.png|27px]] [[Hypernova]] || 3 | ||
|- | |- | ||
| [[Arc Tracer]] || [[File: | | [[Arc Tracer]] || [[File:ArcTSkill5.png|27px]] [[Dynamo Configuration - Fission Shot]] || 2 | ||
|- | |- | ||
| [[Mastermind]] || [[File: | | [[Mastermind]] || [[File:MMSkill1.png|27px]] [[Phantom Seeker]] || 3 | ||
|- | |- | ||
| [[Mastermind]] || [[File: | | [[Mastermind]] || [[File:MMSkill3.png|27px]] [[Aero Mine]] || 1 | ||
|- | |- | ||
| [[Mastermind]] || [[File: | | [[Mastermind]] || [[File:MMSkill4.png|27px]] [[Install - Starfall]] || 3 | ||
|- | |- | ||
| [[Mastermind]] || [[File: | | [[Mastermind]] || [[File:MMSkill5.png|27px]] [[Install - Ultimate Fury]] || 3 | ||
|- | |- | ||
| [[Mastermind]] || [[File: | | [[Mastermind]] || [[File:MMSkill6.png|27px]] [[Dynamo Configuration - Delayed Explosion]] || 1 | ||
|- | |- | ||
| [[Mastermind]] || [[File: | | [[Mastermind]] || [[File:MMSkill7.png|27px]] [[Install - Zero Kelvin Generator]] || 3 | ||
|- | |- | ||
| [[Mastermind# | | [[Mastermind#Transcendence|Transcendent Mastermind]] || [[File:MMTrans1.png|27px]] [[Install - Charged Impulser]] || 1 | ||
|- | |- | ||
| [[Mastermind# | | [[Mastermind#Transcendence|Transcendent Mastermind]] || [[File:MMTrans2.png|27px]] [[Dynamo Configuration - Flick Disc]] || 2 | ||
|- | |- | ||
| [[Mastermind# | | [[Mastermind#Transcendence|Transcendent Mastermind]] || [[File:MMTrans3.png|27px]] [[Force Field]] || 1 | ||
|- | |- | ||
| [[Mastermind# | | [[Mastermind#Transcendence|Transcendent Mastermind]] || [[File:MastermindSkill11.png|27px]] [[Extreme Chaser]] || 2 | ||
|} | |} | ||
|- | |||
| valign="top" | | | valign="top" | | ||
{| class="wikitable sortable" cellpadding="5" border="1" style="border-collapse: collapse;" | {| class="wikitable sortable" cellpadding="5" border="1" style="border-collapse: collapse;" | ||
! class="unsortable" | Class !! class="unsortable" | Skill Name !! DMP Use | ! class="unsortable" | Class !! class="unsortable" | Skill Name !! DMP Use | ||
|- | |- | ||
| [[Time Tracer]] || [[File: | | [[Time Tracer]] || [[File:TimeTracerSkill2.png|27px]] [[Gravity Buster]] || 2 | ||
|- | |- | ||
| [[Time Tracer]] || [[File: | | [[Time Tracer]] || [[File:TimeTracerSkill4.png|27px]] [[Dark Matter Explosion]] || 3 | ||
|- | |- | ||
| [[Time Tracer]] || [[File: | | [[Time Tracer]] || [[File:TimeTracerSkill6.png|27px]] [[Stardust Shower]] ([[Stardust Shower/ModA|A]]) || 3 | ||
|- | |- | ||
| [[Diabolic Esper]] || [[File:TiTSkill6.png|27px]] [[Maximum Strike]] || 3 | | [[Diabolic Esper]] || [[File:TiTSkill6.png|27px]] [[Maximum Strike]] || 3 | ||
| Line 120: | Line 124: | ||
| [[Diabolic Esper]] || [[File:GravityField.png|27px]] [[Gravity Field]] || 3 | | [[Diabolic Esper]] || [[File:GravityField.png|27px]] [[Gravity Field]] || 3 | ||
|- | |- | ||
| [[Diabolic Esper# | | [[Diabolic Esper#Transcendence|Transcendent Diabolic Esper]] || [[File:DETrans2.png|27px]] [[Dynamo Configuration - Reverse Field]] || 1 | ||
|- | |||
| [[Diabolic Esper#Transcendence|Transcendent Diabolic Esper]] || [[File:DETrans3.png|27px]] [[Moonlight Breaker]] || 2 | |||
|- | |||
| [[Diabolic Esper#Transcendence|Transcendent Diabolic Esper]] || [[File:DETrans6.png|27px]] [[Dimension Breaker]] || 3 | |||
|} | |||
| valign="top" | | |||
{| class="wikitable sortable" cellpadding="5" border="1" style="border-collapse: collapse;" | |||
! class="unsortable" | Class !! class="unsortable" | Skill Name !! DMP Use | |||
|- | |||
| [[Affect Tracer]] || [[File:AffectTracerSkill1.png|27px]] [[Ambulance]] || 1 | |||
|- | |||
| [[Affect Tracer]] || [[File:AffectTracerSkill2.png|27px]] [[Radio Knife]] || 3 | |||
|- | |||
| [[Affect Tracer]] || [[File:AffectTracerSkill4.png|27px]] [[Code Yellow]] || 3 | |||
|- | |- | ||
| [[ | | [[Dissembler]] || [[File:DissemblerSkill1.png|27px]] [[Cure]] || 3 | ||
|- | |- | ||
| [[ | | [[Dissembler]] || [[File:DissemblerSkill2.png|27px]] [[Suction]] || 1 | ||
|- | |||
| [[Dissembler]] || [[File:DissemblerSkill3.png|27px]] [[PCA]] || 3 | |||
|- | |||
| [[Dissembler]] || [[File:DissemblerSkill6.png|27px]] [[Immunity]] || 3 | |||
|- | |||
| [[Dissembler#Transcendence|Transcendent Dissembler]] || [[File:DissemblerSkill8.png|27px]] [[False Diagnosis]] || 1 | |||
|- | |||
| [[Dissembler#Transcendence|Transcendent Dissembler]] || [[File:DissemblerSkill10.png|27px]] [[Anesthesia]] || 2 | |||
|- | |||
| [[Dissembler#Transcendence|Transcendent Dissembler]] || [[File:DissemblerSkill11.png|27px]] [[Defibrillator]] || 2 | |||
|} | |} | ||
|} | |} | ||
| Line 149: | Line 177: | ||
|- | |- | ||
! width="6%" | Character | ! width="6%" | Character | ||
! width="46%" | [[ | ! width="46%" | [[File:HQ Shop Item 72550.png|35px]] Specialization A | ||
! width="46%" | [[ | ! width="46%" | [[File:HQ Shop Item 72560.png|35px]] Specialization B | ||
|- | |- | ||
| [[File: | | [[File:Icon - Add.png|center|link=Add]] || DP Usage -x% when awakened (Max: 40%) || Gain Extra DP depending on amount X Dynamo Mutation Point used (Max: 15 DP per DMP) | ||
|} | |} | ||
<br> | <br> | ||
==Updates== | ==Updates== | ||
{| cellpadding="5" border="1" style="border-collapse: collapse; text-align: center" | {| cellpadding="5" border="1" style="border-collapse: collapse; text-align: center" class="colortable-Add updates-table" | ||
|- | |||
! colspan=2 | Date !! colspan=2 | Changes | ! colspan=2 | Date !! colspan=2 | Changes | ||
|- | |- | ||
! KR !! NA !! PvE !! PvP | ! KR !! NA !! PvE !! PvP | ||
|- | |- | ||
| Line 173: | Line 201: | ||
*Fixed issue where overflow damage can be counted as DP recover when being killed. | *Fixed issue where overflow damage can be counted as DP recover when being killed. | ||
|- | |- | ||
| 12/01/2016 || | | 12/01/2016 || 01/11/2017 || colspan=2 align="left" | | ||
*{{nerf|DP used in Dynamo Configuration Mode changed from 0% to 20%.}} | *{{nerf|DP used in Dynamo Configuration Mode changed from 0% to 20%.}} | ||
|- | |- | ||
| Line 194: | Line 222: | ||
{{SpecialAbilities}} | {{SpecialAbilities}} | ||
{{Guides}} | {{Guides}} | ||
</noinclude> | |||
Revision as of 09:49, 27 March 2024
Dynamo Point System


Add does not have an Awakening Gauge, but instead has Dynamo Points (DP), which are consumed when awakening or using skills and commands.
By default, Add will be in Dynamo Dissolution mode. Once awakened, he will enter the Dynamo Configuration mode.
- The total number of DP is 400.
- DP can be obtained by hitting during Dynamo Dissolution mode or being attacked in both modes.
- The gauge is not affected by mount attacks.
- When you have at least 100 DP, Add is able to enter the Dynamo Configuration mode (Awakening) at the cost of 50 DP (DP consumption reduction will reduce this), dealing 300% magical damage to surrounding targets.
- Awakening can be turned on/off freely, but re-awakening can only be done after 5 seconds of awakening.
- During Dynamo Configuration mode (Awakening), commands will deplete the DP gauge instead.
- Unlike other characters, the awakening duration is unlimited. DP is gradually increase at a rate of 5 DP per second in PvE.
- Like awakening, Add will gain a damage boost when in DC Mode.
- If you obtain a awakening potion in dungeons, instead of awakening, the DP gauge will increase.
- This also applies when Fever triggers.
- Unlike a normal awakening, when Add goes into DC mode, the screen will not freeze.
- Add does, however, gain momentary invincibility.
- When in awakening , some skills that use DP will use only 20% of the required amount, whereas some skills that recover DP when he is in Normal Mode won't recover DP in DC mode.
- Different job advancements will have different DC mode poses.
- When going into DC mode, enemies surrounding you will be damaged.
Benefits of Dynamo Configuration mode:
- The standard 20% damage increase from awakening mode.
- Able to execute Nasod Armor combo extensions depending on the job advancement.
- Nasod Armor combo extensions have no knockdown value.
- Able to reduce the usage of DP to 20% for a skill which uses DP.
Dynamo Mutation Points
Every 5 seconds (10 in PvP) without using a skill, Add will have 1 Dynamo Mutation Point added to the slots below his portrait. When Add goes into Dynamo Configuration mode, he will completely refill his Dynamo Mutation Point slots. Dynamo Mutation Points are used to power up his skills. Skills will only be boosted if Add is in Dynamo Configuration mode.
Skills that use Dynamo Mutation Points
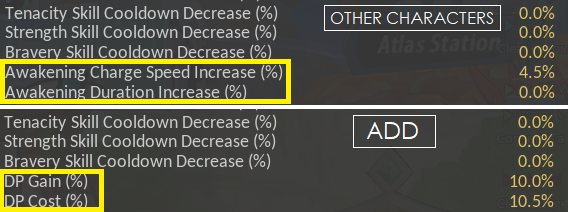
Stats Difference
Specialization (Not available anymore)
Updates
Class Mechanics and Abilities
General Guides
{{
Story
Gameplay
Modes
Combat
Character Progression
Systems
Summons
Items
Equipment
Functionality
Cash
Miscellaneous
Other Media
|
||||||||||||||||||||||||||||||||||||||||||||||||||


