Monster List/Lanox/Miniboss: Difference between revisions
Shironsaki (talk | contribs) No edit summary |
m (Text replacement - " <br> *" to "<br> *") |
||
| (19 intermediate revisions by 4 users not shown) | |||
| Line 2: | Line 2: | ||
{| cellspacing="0" cellpadding="5" border="1" width="100%" style="border-collapse: collapse;" | {| cellspacing="0" cellpadding="5" border="1" width="100%" style="border-collapse: collapse;" | ||
|- style="background-color: {{ColorSel|Village|9}};" | |- style="background-color: {{ColorSel|Village|9}};" | ||
! width=200 |Monster Image | ! width=200 |Monster Image | ||
! width=400 |Monster Description | ! width=400 |Monster Description | ||
! Info | ! Info | ||
|- style="background-color: {{ColorSel|Village|9}};" | |||
! colspan="3" | [[Burnt Forest|9-1, Burnt Forest]] | |||
|- | |- | ||
|align=center|[[File:AngryMotherPig.png|200px]] | |align=center|[[File:AngryMotherPig.png|200px]] | ||
|'''Angry Mother Pig''' - A stronger, enraged boar that is capable of more powerful attacks. | |'''Angry Mother Pig''' - A stronger, enraged boar that is capable of more powerful attacks. | ||
|'''Moves:''' | |'''Moves:''' | ||
* '''Flamethrower:''' Exhales a constant wave of fire at players. Stoic is enabled. | |||
* '''Rage Rush:''' Charges while in stoic, knocking players up. | |||
---- | |||
'''Notes:''' | |||
<br> | |||
- She appears only on Hard and Very Hard difficulties. | |||
---- | |||
'''Drops:'''<br> | |||
* Crystallized Bow of Fire | |||
* [[Crystallized Long Sword of Fire]] | |||
* Crystallized Spear of Fire | |||
* Crystallized Claymore of Fire | |||
* Crystallized Bow of Fire | |||
* Crystallized Dual Weapon of Fire | |||
|- style="background-color: {{ColorSel|Village|9}};" | |||
! colspan="3" | [[Ash Covered Village|9-2, Ash Covered Village]] | |||
|- | |- | ||
|align=center|[[File:SupervisorAluminuFull.jpg|200px]] | |align=center|[[File:SupervisorAluminuFull.jpg|200px]] | ||
|'''Supervisor Aluminu''' - One of the head Black Smiths, guarding the entrance into the mines and his boss's door. | |'''Supervisor Aluminu''' - One of the head Black Smiths, guarding the entrance into the mines and his boss's door. | ||
|'''Moves:''' | |'''Moves:''' | ||
* '''Hammer Smash:''' Aluminu will take his giant hammer and smash the area in front of him several times. | |||
* '''Run Away:''' Aluminu can run to the side while in super armor. | |||
* '''Hammer Throw:''' He will start chucking hammers in a parabolic arc. | |||
---- | |||
'''Notes:''' | |||
<br> | |||
- He appears only on Hard and Very Hard difficulties. <br> | |||
- He is fought twice throughout the dungeon run. | |||
---- | |||
'''Drops:'''<br> | |||
* Sword of the Steel Anvil | |||
* Staff of the Steel Anvil | |||
* Drone of the Steel Anvil | |||
* Cannon of the Steel Anvil | |||
|- style="background-color: {{ColorSel|Village|9}};" | |||
! colspan="3" | [[Phantasmal Geyser|9-3, Phantasmal Geyser]] | |||
|- | |- | ||
|align=center|[[File:9-3miniboss.png|200px]] | |align=center|[[File:9-3miniboss.png|200px]] | ||
|''' | |'''Entranced Aluminu''' - One of the head Black Smiths clad in his Black Smith armor and spa towels. He wields a giant backet. | ||
|'''Moves:''' | |'''Moves:''' | ||
* '''Bucket Smash:''' Aluminu will take his giant bucket and smash the area in front of him several times. <br> | |||
* '''Run Away:''' Aluminu can run to the side while in super armor. <br> | |||
* '''Bucket Throw:''' He will start chucking buckets in a parabolic arc. | |||
---- | |||
'''Notes:''' | |||
<br> | |||
- He appears only on Hard and Very Hard difficulties. | |||
---- | |||
'''Drops:'''<br> | |||
* Sword of the Steel Anvil | |||
* Staff of the Steel Anvil | |||
* Drone of the Steel Anvil | |||
* Cannon of the Steel Anvil | |||
|- style="background-color: {{ColorSel|Village|9}};" | |||
! colspan="3" | [[Volcanic Flame Entrance|9-4, Volcanic Flames Entrance]] | |||
|- | |- | ||
|[[ | |align=center|[[File:BerserkerArmageddon.png|250px]] | ||
|'''Berserker Armageddon''' - An armored magma titan that fights alongside Ignia. | |||
|''' | |||
|'''Moves:''' | |'''Moves:''' | ||
* '''Flame Lariat:''' He will spin around arms a blazed. | |||
* '''Revive:''' Ignia will revive him once. | |||
---- | |||
'''Notes:''' | |||
<br> | |||
- Berserker Armageddon can only be fought on '''Hard''' and '''Very Hard''' difficulties. On '''Normal''', only '''Ignia''' and the minor demons will appear | |||
---- | |||
'''Drops''' | |||
* Red Lava Demon Sword | |||
* Red Lava Demon Staff | |||
* [[Red Lava Demon Bow]] | |||
* Red Lava Demon Claymore | |||
* Red Lava Demon Dual Weapon | |||
|- style="background-color: {{ColorSel|Village|9}};" | |||
! colspan="3" | [[Collapsing Temple of Fire|9-5, Collapsing Temple of Fire]] | |||
|- | |- | ||
|[[ | |align=center|[[File:DemonJin.png|200px]] | ||
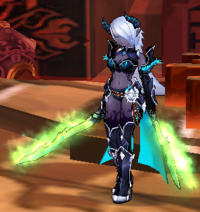
|'''Entranced Demon Jin''' - A demon who fights with twin blades. | |||
|'''Jin''' - demon who fights | |||
|'''Moves''' | |'''Moves''' | ||
* '''5-hit Sword Combo:''' She will perform a 5 slash combo with her whip like dual swords. | |||
* '''Sweeping Slash:''' Jin will charger and splash her swords in a circular disk around her. | |||
* '''Darkness Explosion:''' Gather around darkness aura, then explode it. Similar to [[Barren Sander|Waldo's]] Pendant Explosion. | |||
---- | |||
'''Notes:''' | |||
<br> | |||
- Jin only appears on Hard and Very Hard difficulties | |||
---- | |||
'''Drops:''' | |||
* Blue Lava Demon Blade | |||
* Blue Lava Demon Drone | |||
* Blue Lava Demon Cannon | |||
* Blue Lava Demon Spear | |||
* Blue Lava Demon Dynamo | |||
|- | |- | ||
|[[9-6]] | |align=center|[[File:DemonIn.png|200px]] | ||
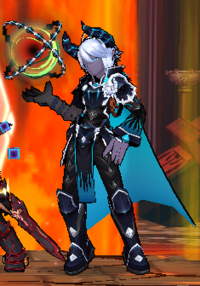
|align=center| | |'''Enslaved Demon In''' - A demon who fights with a demonic orb. | ||
|'''Moves:''' | |||
* '''Attraction Void:''' In will send his sphere forward sucking in players before detonating it dealing continuous hits to anybody in range. | |||
* '''Release Void:''' He will hold his weapon behind him then send it out dealing continuous damage to anybody in range. | |||
---- | |||
'''Notes:''' | |||
<br> | |||
- In can only be fought on Hard or Very Hard difficulties | |||
---- | |||
'''Drops:''' | |||
* Blue Lava Demon Blade | |||
* Blue Lava Demon Drone | |||
* Blue Lava Demon Cannon | |||
* Blue Lava Demon Spear | |||
* Blue Lava Demon Dynamo | |||
|- style="background-color: {{ColorSel|Village|9}};" | |||
! colspan="3" | [[Grand Cavern: Chasm of the Divided Land|9-6, Grand Cavern: Chasm of the Divided Land]] | |||
|- | |||
|align=center|[[File:9-6miniboss1.png|200px]] | |||
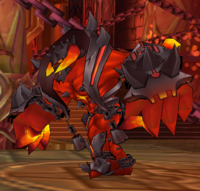
|'''Berserker Armageddon''' - An armored magma titan | |'''Berserker Armageddon''' - An armored magma titan | ||
|'''Moves:''' | |'''Moves:''' | ||
* '''Flame Lariat:''' He will spin around arms a blazed. | |||
---- | |||
'''Notes:''' | |||
<br> | |||
- Like his first appearance, Berserker Armageddon only appears on Hard and Very Hard difficulties | |||
---- | |||
'''Drops:''' | |||
* Red Lava Demon Sword | |||
* Red Lava Demon Staff | |||
* [[Red Lava Demon Bow]] | |||
* Red Lava Demon Claymore | |||
* Red Lava Demon Dual Weapon | |||
|- | |- | ||
|[[9- | |align=center|[[File:9-6miniboss2.png|200px]] | ||
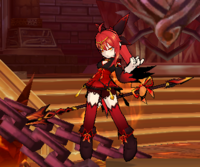
|'''Traitor Ignia''' - The former Fire Priestess that led us to the temple, she now holds the Nature Priestess captive. | |'''Traitor Ignia''' - The former Fire Priestess that led us to the temple, she now holds the Nature Priestess captive. | ||
|'''Moves:''' | |'''Moves:''' | ||
* '''Fire Spear:''' Ignia will infuse her spear with fire and perform a few slashes.<br> | |||
* '''Teleport:''' Any time during the battle she can teleport. <br> | |||
* '''Meteor Shower:''' Ignia will unleash a few meteors to fall from the sky <br> | |||
* '''Meteor Rain:''' Ignia will unleash a flurry of small meteors which constantly rain as it progressively moves forward.<br> | |||
* '''Fire Shield:''' Ignia will cast a shield which burns anyone around her. | |||
---- | |||
'''Notes:''' | |||
<br> | |||
- Traitor Ignia can only be fought on Hard and Very Hard difficulties | |||
---- | |||
'''Drops:''' | |||
* '''Ignia's Earrings''' | |||
* '''Ignia's Battle Bracelet''' | |||
* '''Ignia's Spear''' | |||
|- | |||
|align=center|[[File:9-6miniboss4.png|200px]] | |||
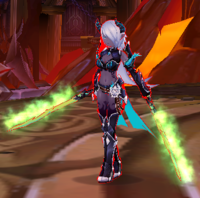
|'''Entranced Demon Jin''' - A demon who fights with twin blades. Fights together with twin brother; In. | |||
|'''Moves''' | |||
* '''5-hit Sword Combo:''' She will perform a 5 slash combo with her whip like dual swords. | |||
* '''Sweeping Slash:''' Jin will charger and splash her swords in a circular disk around her. | |||
* '''Darkness Explosion:''' Gather around darkness aura, then explode it. Similar to [[Barren Sander|Waldo's]] Pendant Explosion. | |||
---- | |||
'''Notes:''' | |||
<br> | |||
- Like her first appearance, Jin can only be fought on Hard and Very Hard difficulties | |||
---- | |||
'''Drops:''' | |||
* Blue Lava Demon Blade | |||
* Blue Lava Demon Drone | |||
* Blue Lava Demon Cannon | |||
* Blue Lava Demon Spear | |||
* Blue Lava Demon Dynamo | |||
|- | |||
|align=center|[[File:9-6miniboss3.png|200px]] | |||
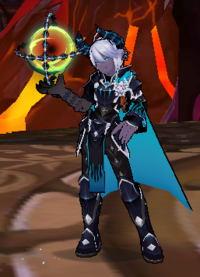
|'''Enslaved Demon In''' - A demon who fights with a demonic orb. Fights together with twin sister; Jin. | |||
|'''Moves:''' | |||
* '''Attraction Void:''' In will send his sphere forward sucking in players before detonating it dealing continuous hits to anybody in range. | |||
* '''Release Void:''' He will hold his weapon behind him then send it out dealing continuous damage to anybody in range. | |||
---- | |||
'''Notes:''' | |||
<br> | |||
- Like his first appearance, In can only be fought on Hard and Very Hard difficulties. | |||
---- | |||
'''Drops:''' | |||
* Blue Lava Demon Blade | |||
* Blue Lava Demon Drone | |||
* Blue Lava Demon Cannon | |||
* Blue Lava Demon Spear | |||
* Blue Lava Demon Dynamo | |||
|} | |} | ||
{{Beastiary 2}} | {{Beastiary 2}} | ||
{{Guides}} | {{Guides}} | ||
Latest revision as of 10:16, 4 December 2020
- English
| Monster Image | Monster Description | Info |
|---|---|---|
| 9-1, Burnt Forest | ||
|
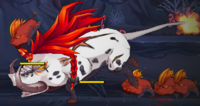
Angry Mother Pig - A stronger, enraged boar that is capable of more powerful attacks. | Moves:
Notes:
Drops:
|
| 9-2, Ash Covered Village | ||
|
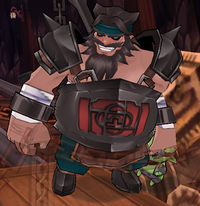
Supervisor Aluminu - One of the head Black Smiths, guarding the entrance into the mines and his boss's door. | Moves:
Notes:
Drops:
|
| 9-3, Phantasmal Geyser | ||
|
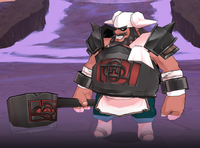
Entranced Aluminu - One of the head Black Smiths clad in his Black Smith armor and spa towels. He wields a giant backet. | Moves:
Notes:
Drops:
|
| 9-4, Volcanic Flames Entrance | ||
|
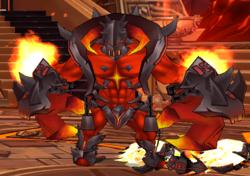
Berserker Armageddon - An armored magma titan that fights alongside Ignia. | Moves:
Notes:
Drops
|
| 9-5, Collapsing Temple of Fire | ||
|
Entranced Demon Jin - A demon who fights with twin blades. | Moves
Notes:
Drops:
|
|
Enslaved Demon In - A demon who fights with a demonic orb. | Moves:
Notes:
Drops:
|
| 9-6, Grand Cavern: Chasm of the Divided Land | ||
|
Berserker Armageddon - An armored magma titan | Moves:
Notes:
Drops:
|
|
Traitor Ignia - The former Fire Priestess that led us to the temple, she now holds the Nature Priestess captive. | Moves:
Notes:
Drops:
|
|
Entranced Demon Jin - A demon who fights with twin blades. Fights together with twin brother; In. | Moves
Notes:
Drops:
|
|
Enslaved Demon In - A demon who fights with a demonic orb. Fights together with twin sister; Jin. | Moves:
Notes:
Drops:
|
| Bestiary | ||||||||
|---|---|---|---|---|---|---|---|---|
|